Start freeThree chapters, 50 questions and a full timed mock. No card.
Study Guide
You'll remember the picture.
Don't take our word for it. These are real pages from the three chapters you get free. Turn them.
Scapular Y
The Scapular Y Lateral
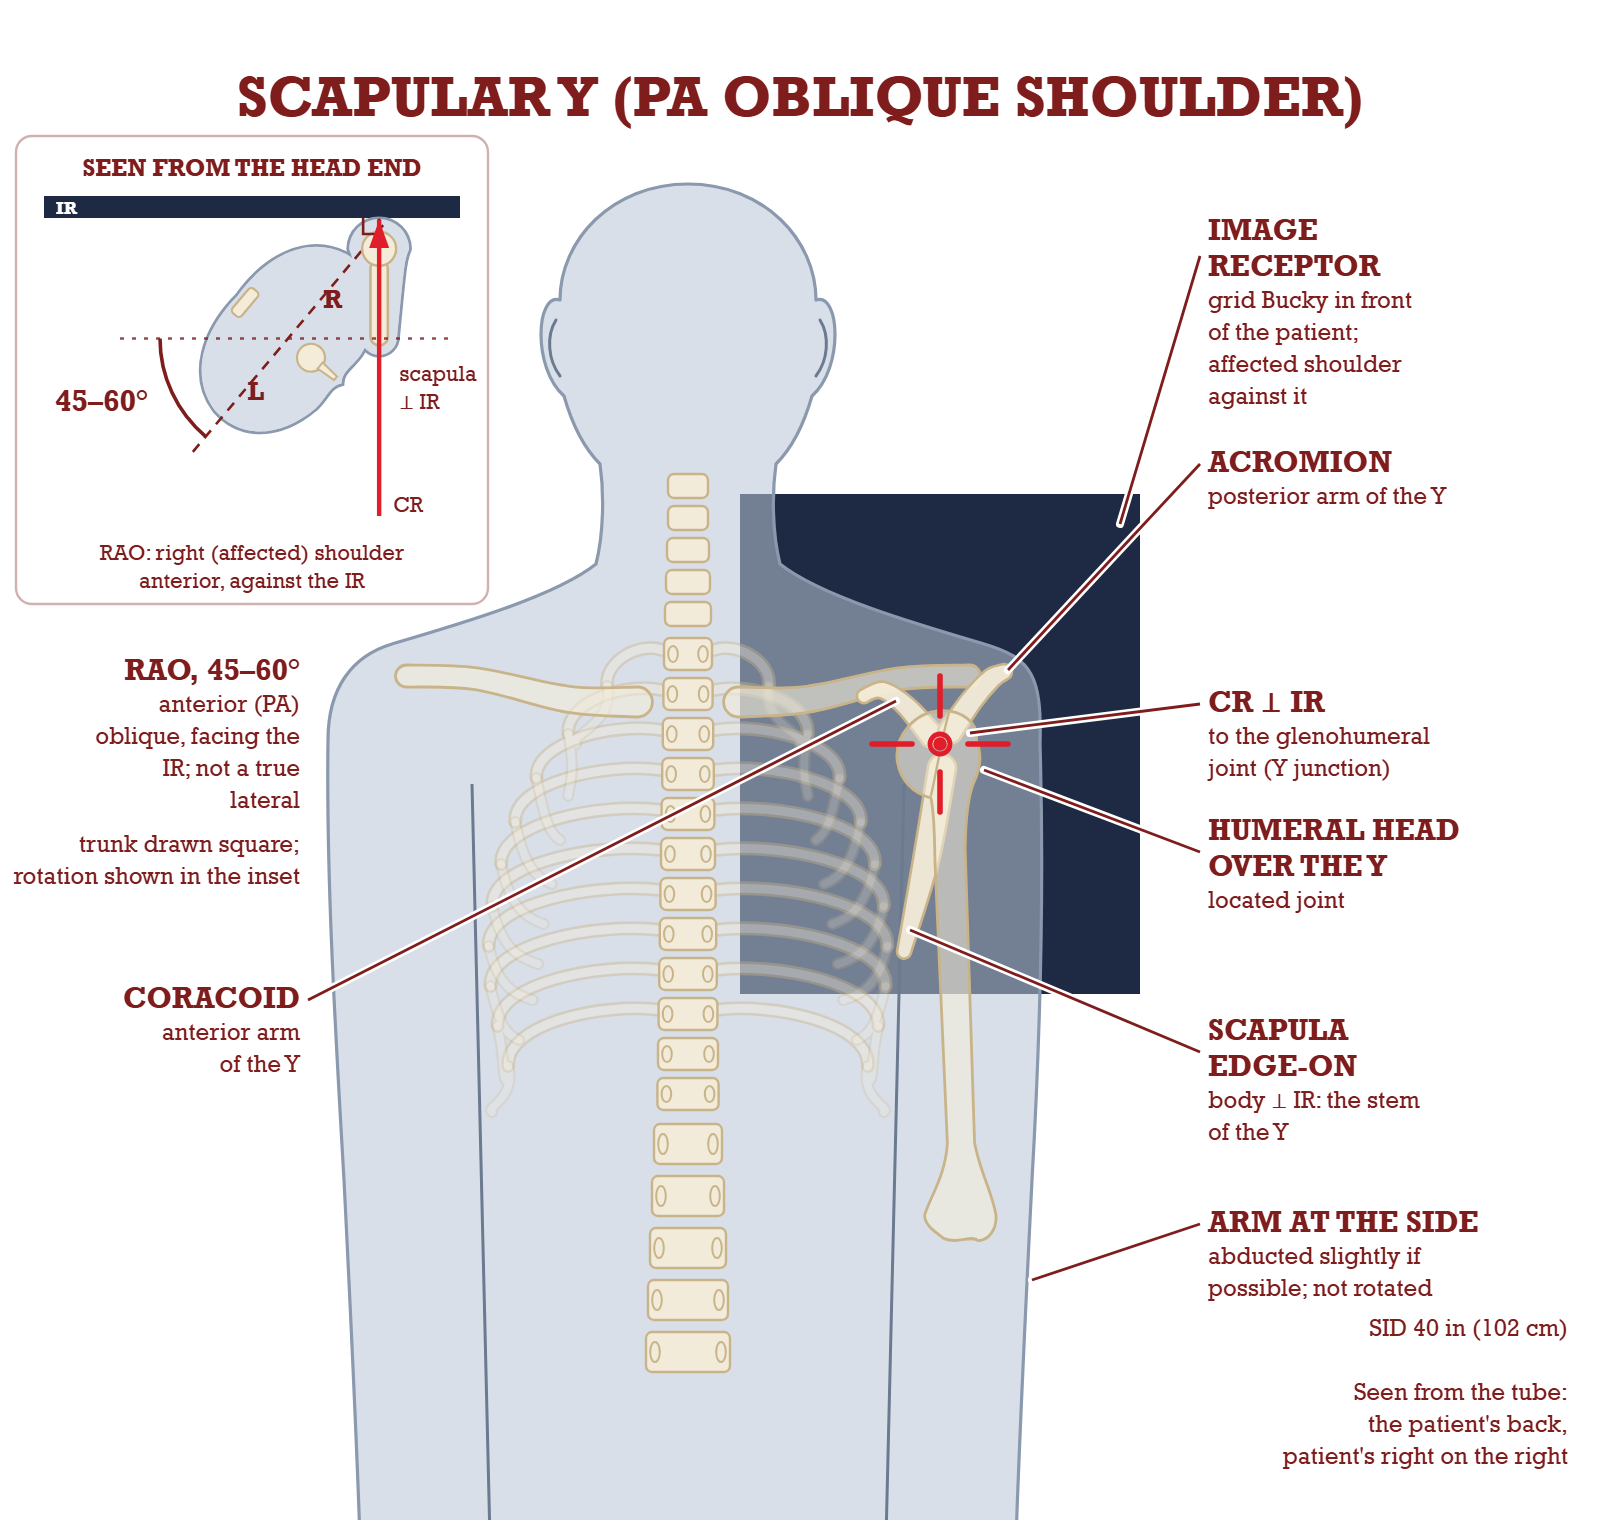
PA oblique, 45 to 60 degrees
Rotate a patient until the thin body of the scapula is edge-on to the beam and it projects as a letter Y. The two upper limbs are the acromion (posterior) and the coracoid process (anterior). The long lower leg is the body of the scapula. Where the three meet is the glenoid cavity, and that is where a normal humeral head sits.
The patient faces the receptor in an anterior oblique, turned until the scapula is edge-on to the beam: that edge is what prints as the Y. The CR passes perpendicular through the scapulohumeral joint, entering from behind so the shoulder of interest stays against the IR.
PA oblique scapular Y and its AP alternative
View
Positioning
Center(CR)
SID
Technique
PA oblique, scapular Ytrauma routine, preferred
Patient faces the IR in an anterior oblique. Palpate the superior angle of the scapula and the AC joint, then rotate until an imaginary line between those two points is perpendicular to the IR. Obliquity ends up 45 to 60 degrees.Abduct the arm slightly so the humerus is off the ribs. Do not rotate the arm.
Scapulohumeral joint, perpendicular2 inches (5 cm) below the AC joint
40 inches102 cm minimum
75 plus or minus 5 kV analog, 80 plus or minus 5 digitalGrid, vertical, CR to centerline. 24 x 30 cm portrait
AP oblique Yalternative when the patient cannot face the IR
Taken recumbent in the opposite AP oblique, with the injured shoulder raised off the table on supports. Same anatomical endpoint, beam entering from the front.Cross-referenced to the recumbent lateral scapula position.
Scapulohumeral jointSame landmark, reached from the other side
40 inches102 cm minimum
75 plus or minus 5 kV analog, 80 plus or minus 5 digitalGrid. Expect more magnification from the larger OID
What to know about the Y view
CR for the Y view
Perpendicular to the IR, directed to the scapulohumeral joint, 2 inches (5 cm) below the AC joint.
When the AP Y is used
When the patient's condition will not allow them to face the IR. It is taken recumbent, in the opposite AP oblique, with the injured shoulder raised.
Why PA is preferred: image quality
Facing the IR puts the scapula and shoulder of interest against the receptor. Less OID means less magnification and a sharper image. The AP version is explicitly a magnified one.
Why PA is preferred: dose
Entering posteriorly means the thyroid and breast take exit dose rather than entrance dose. Both are radiosensitive organs at risk in shoulder work.
What the Y demonstrates
A true lateral of the scapula, the proximal humerus and the scapulohumeral joint. In practice: dislocation direction.
A correctly rotated Y ✓
Reading rotation errors
Vertebral and lateral borders not superimposed: not a true lateral, so the rotation needs adjusting.
Ribs over the scapular body: the obliquity is off, in a direction the standard text does not name, so re-palpate rather than guess.
Y limbs clearly uneven: the obliquity is wrong in one direction or the other.
Writing off a humeral head that sits off the base of the Y as a rotation error: the standard text reads it as dislocation, below the coracoid for anterior and below the acromion for posterior.
Starting from a fixed number instead of the palpated superior angle and AC joint.
Be honest about where the standard text stopsThe standard text prints the correct appearance of a Y view and never labels over-rotation and under-rotation separately. The one measurable it does give you is on the lateral scapula page, which is the same body position: a true lateral shows the vertebral and lateral borders directly superimposed. Anything else is a rotation error, and the text gives no way to tell which direction: palpate the superior angle and AC joint again and reset the line between them perpendicular to the IR. Say what you see rather than guessing a degree value you cannot support.
Elbow anatomy
The Elbow, Bone by Bone
Three bones, one hinge
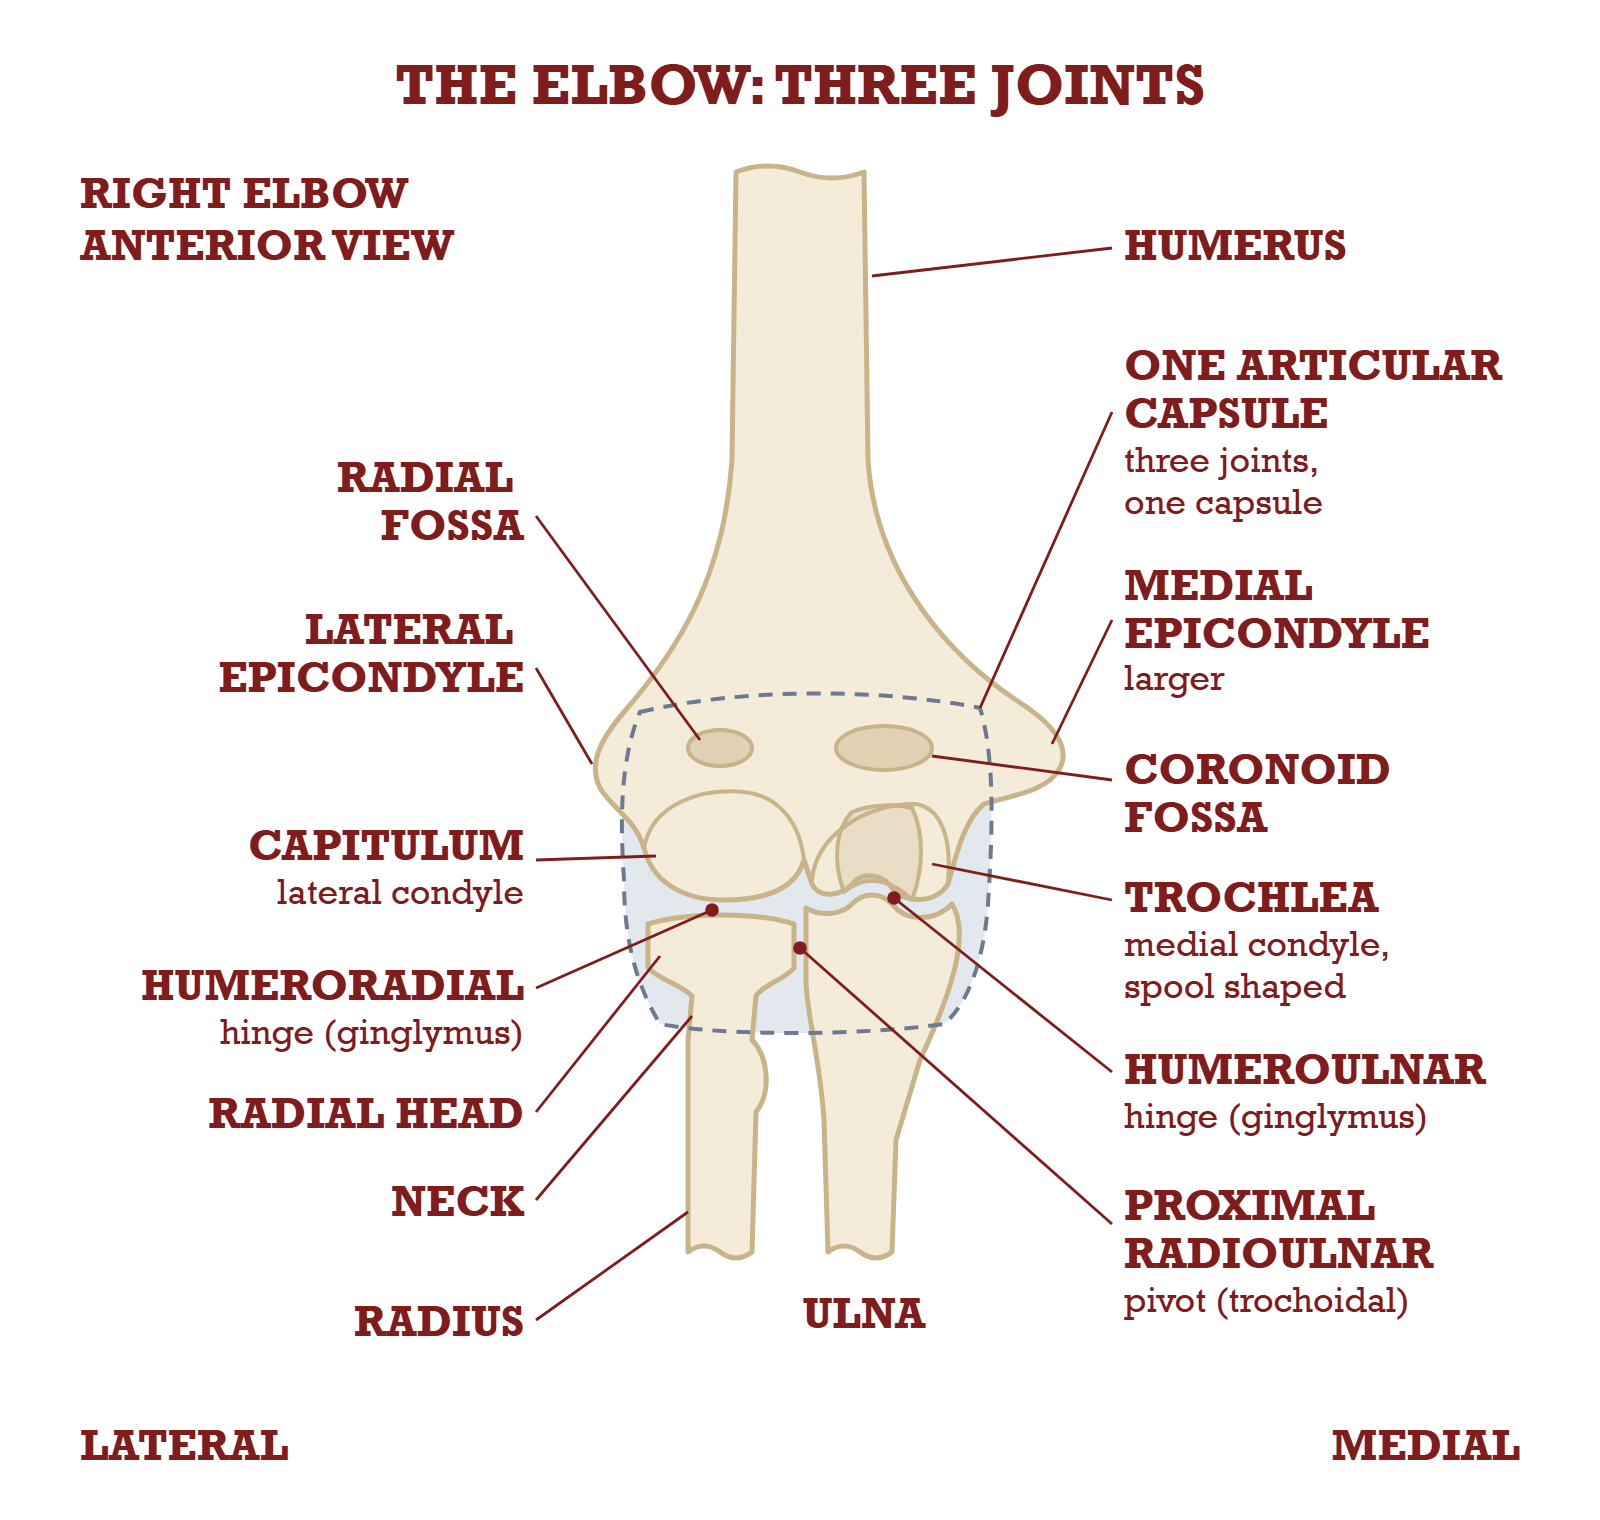
Three bones meet here: the distal humerus, the proximal radius and the proximal ulna. The AP and the lateral show all three together; most of the other elbow projections in this chapter exist to throw one part clear of the other two. So learn which landmark belongs to which bone, because each oblique is named for the way the arm rotates, and it frees the parts on that side.
Read the elbow side by side. Laterally the capitulum meets the radial head; medially the trochlea meets the ulna. The radial head also turns against the ulna, so the elbow is really three joints in one capsule: two hinges and one pivot.
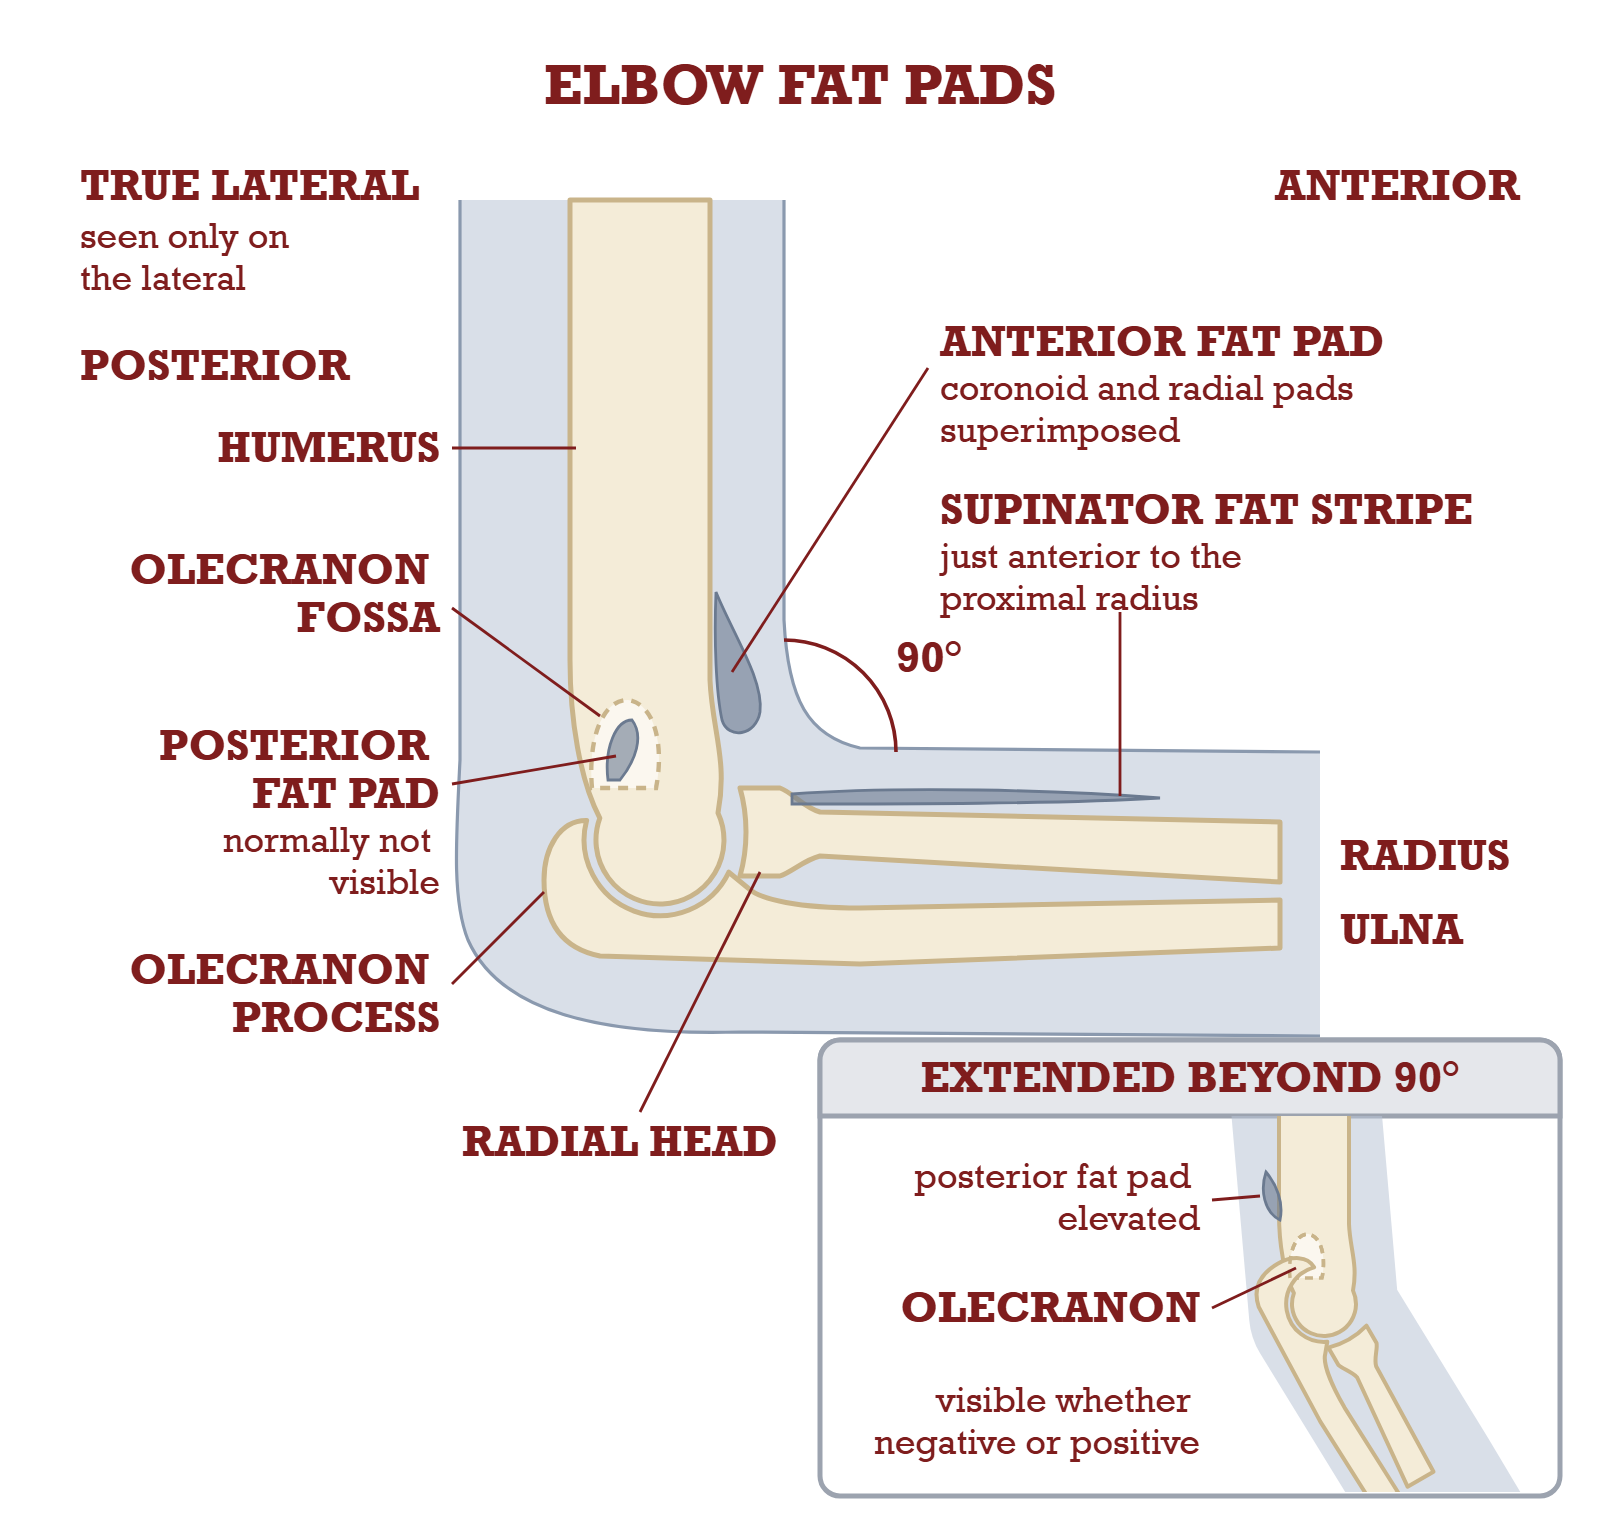
At 90 degrees of flexion the anterior fat pad shows as a teardrop in front of the humerus and the posterior fat pad stays hidden in the olecranon fossa, so seeing the posterior pad points to a change in the joint. Extend the elbow past 90 degrees and the olecranon slides into the fossa and lifts that pad into view whether the exam is negative or positive.
Distal humerus
Capitulum
The rounded lateral condyle. It articulates with the head of the radius.
Trochlea
The spool-shaped medial condyle. It articulates with the trochlear notch of the ulna.
Medial and lateral epicondyles
The two bumps you palpate. The plane between them is the interepicondylar plane, and it sets the routine elbow and humerus positions in this chapter, the AP shoulder rotations included.
Olecranon fossa
The posterior depression. With the arm fully extended the olecranon process seats in it.
Trochlear sulcus
The smooth depressed groove in the center of the trochlea. It is the smallest and innermost of the three concentric arcs on a true lateral.
Proximal radius and ulna
Radial head
The disc at the top of the radius, articulating with the capitulum. This is what the lateral (external) oblique is for.
Radial neck and tuberosity
Neck just below the head. The radial tuberosity (radial tubercle) sits below that on the medial and anterior side of the shaft.
Olecranon process
The point of the elbow you lean on. Seen in profile on the lateromedial projection.
Coronoid process
The anterior beak of the proximal ulna. This is what the medial (internal) oblique is for.
Trochlear notch
The C-shaped notch between the olecranon and coronoid processes. It grips the trochlea.
The soft tissue that makes the diagnosis
Where they live
Fat pads are extrasynovial but inside the joint capsule. Fluid in the capsule moves them, which is how they report an injury you cannot see.
Anterior fat pad
A teardrop-shaped lucency just anterior to the distal humerus, formed by the superimposed coronoid and radial pads. Trauma lifts and distorts it.
Posterior fat pad
Sits deep in the olecranon fossa and is normally not visible. Seeing it is the finding, and the standard text calls it the more reliable of the two.
Supinator fat stripe
A long thin stripe just anterior to the proximal radius. Displacement can be the only sign of a radial head or neck fracture.
Only on the lateral
All three are visible on the lateral projection only. On the AP they are superimposed over bone.
Why the lateral elbow has to be flexed 90 degreesThe standard text sets three conditions for the fat pads to mean anything: the elbow flexed 90 degrees, a true lateral, and exposure that still shows soft tissue. Miss the flexion and you create a false result. If the elbow is extended beyond 90 degrees, the olecranon slides into the olecranon fossa, lifts the posterior fat pad and makes it appear whether or not there is any injury. There is one exception to the 90 degrees: certain soft tissue diagnoses need only 30 to 35 degrees of flexion, and those are taken only when specifically indicated.
Anatomy
Inside the Kidney
Cortex, medulla, nephron
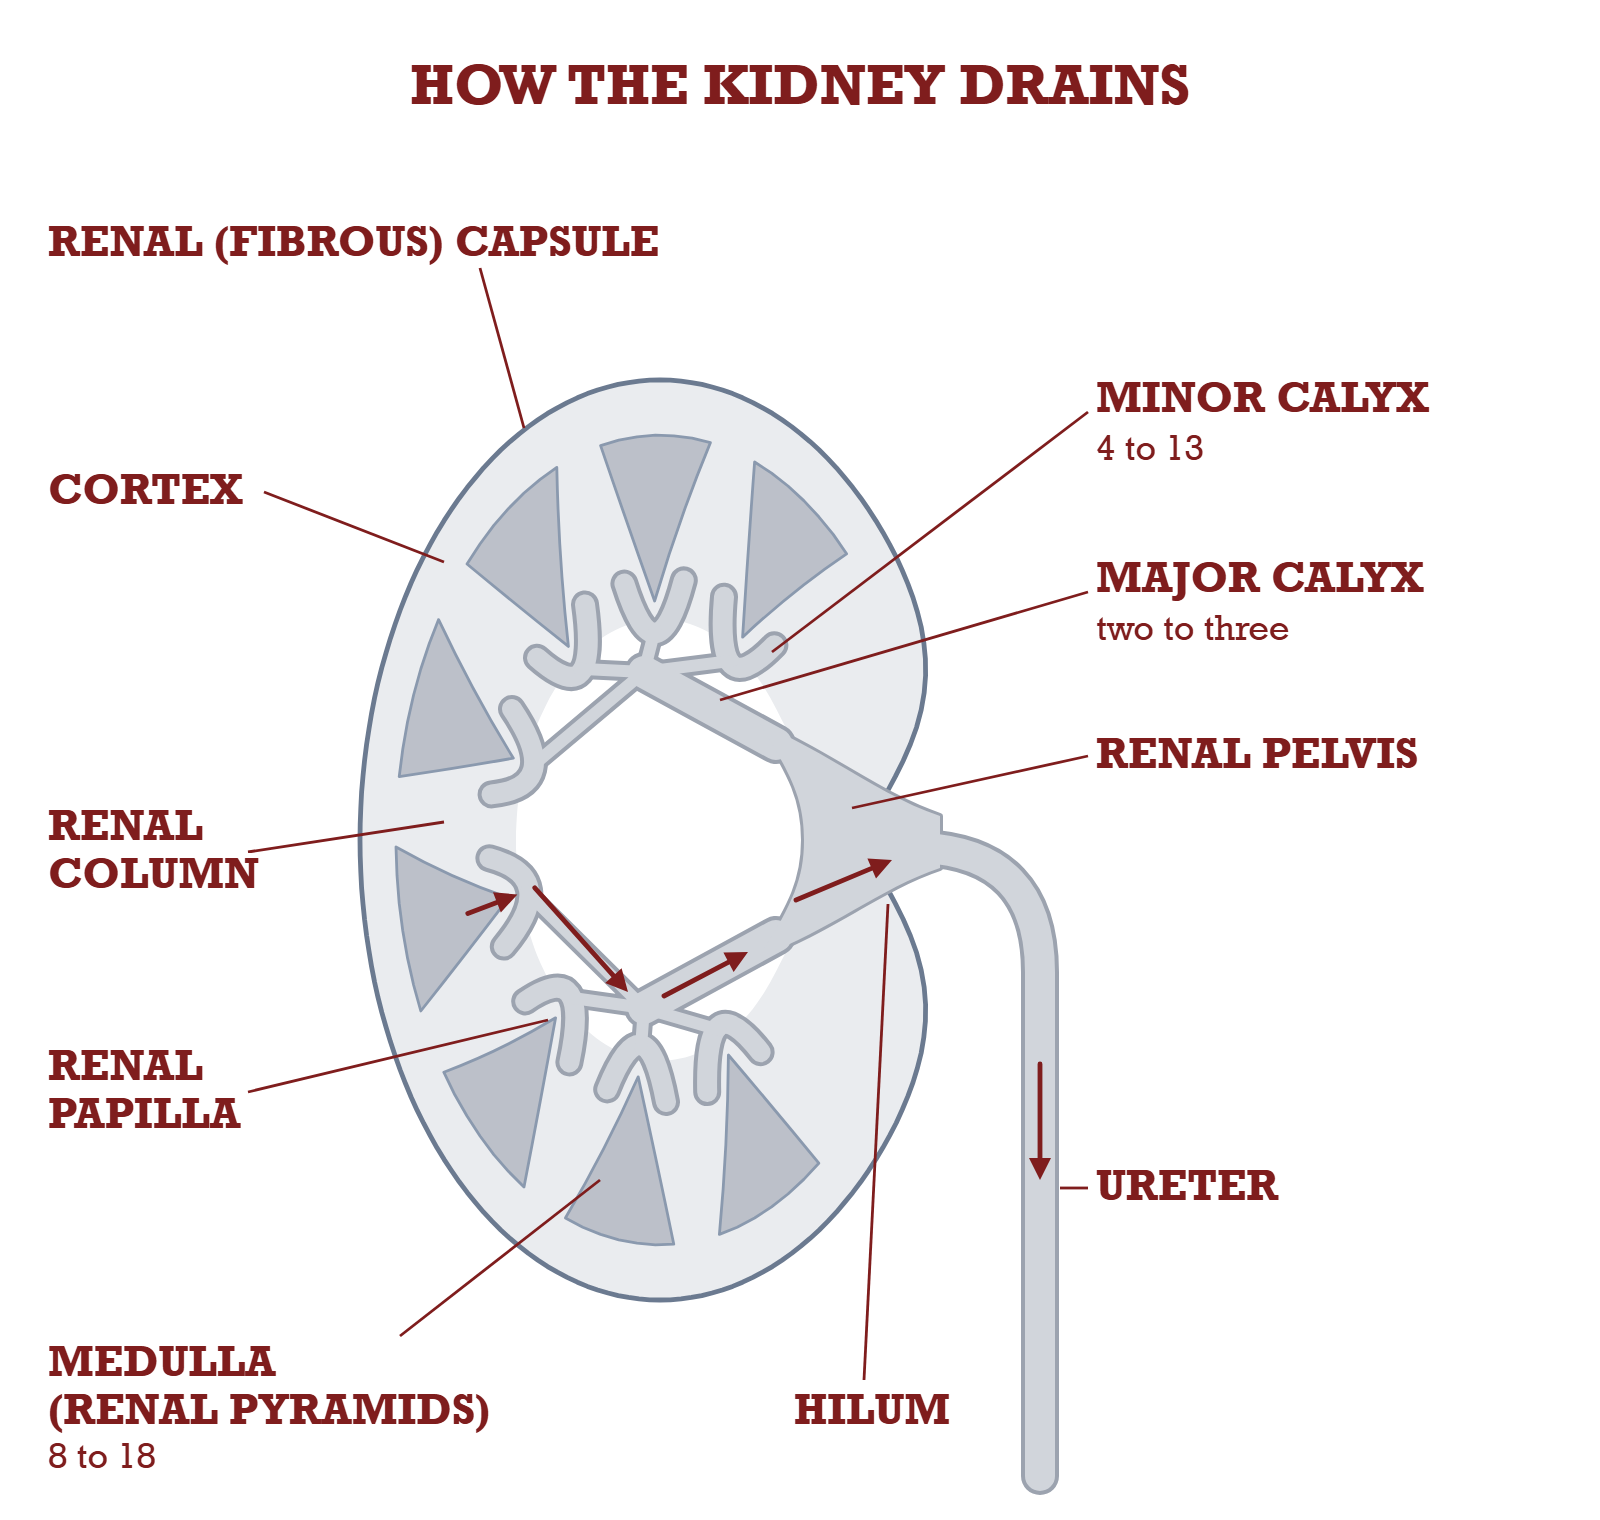
Two layers, one drainage tree and one microscopic unit. The cortex is the outer portion, sitting under the renal (fibrous) capsule. The medulla under it is built of 8 to 18 conical renal pyramids, with cortex dipping between them as the renal columns.
The drainage tree, in order: each renal pyramid empties at its papilla into a minor calyx, minor calyces join into two or three major calyces, and those join into the renal pelvis, which narrows at the hilum into the ureter. The cortex is the outer layer under the capsule and dips between the pyramids as the renal columns; the pyramids make up the medulla.
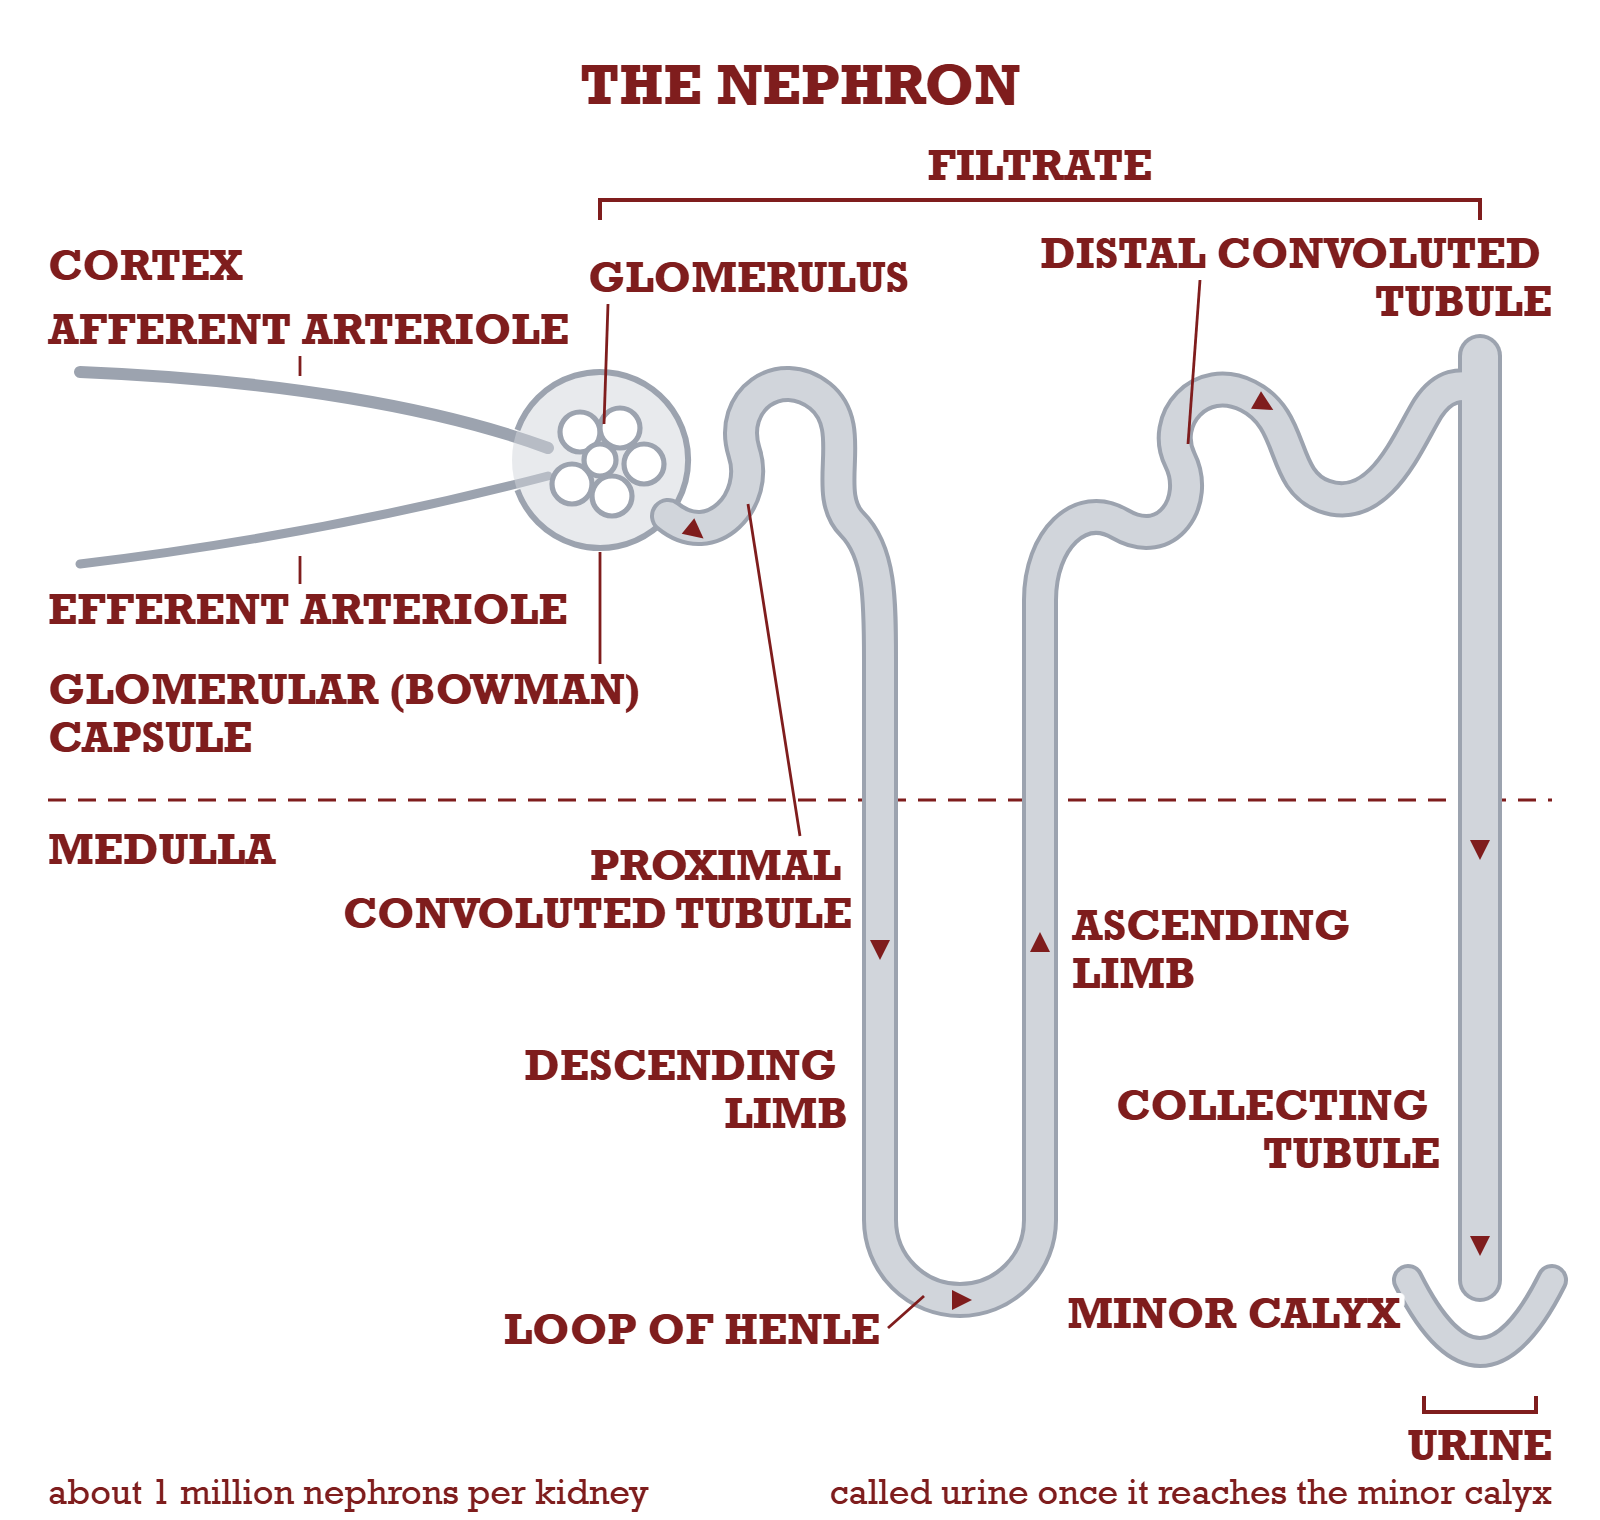
One nephron, the working unit, and there are about a million in each kidney. Blood is filtered at the glomerulus and the Bowman capsule catches the filtrate, which runs through the proximal convoluted tubule, down and back up the loop of Henle, through the distal convoluted tubule and down a collecting tubule. The filtering parts sit in the cortex and the loop and collecting tubules in the medulla. Only at the minor calyx is the fluid called urine.
The drainage tree, in order
Renal papilla
The apex of each pyramid, where its tubules converge and drain out.
Minor calyces
Hollowed flattened tubes. 4 to 13 of them per kidney.
Major calyces
The minor calyces unite into two to three major calyces.
Renal pelvis
The major calyces unite into one larger flattened funnel. It narrows at the hilum to continue as the ureter.
Renal parenchyma
The general term for the total functional portion of the kidney. This is what a nephrogram shows as a blush.
The nephron, in outline
What it is
The structural and functional unit of the kidney. About 1 million per kidney, and microscopic.
Where filtering starts
The glomerulus, a capillary tuft in the cortex. The afferent arteriole brings blood in, the efferent arteriole takes it away.
The catcher
The glomerular (Bowman) capsule surrounds the glomerulus and collects the filtrate.
The route out
Proximal convoluted tubule, then the loop of Henle with its descending and ascending limbs, then distal convoluted tubule, then collecting tubule, then a minor calyx.
Where each part lives
Glomeruli, capsules and both convoluted tubules sit in the cortex. Loop of Henle and collecting tubules sit mainly in the medulla.
When it becomes urine
The filtrate is only called urine once it reaches the minor calyx. Before that it is filtrate.
The numbers
Blood share
At rest about 25% of each heartbeat output passes through the kidneys. More than 1 L of blood every 60 seconds.
Filtrate per day
About 180 L removed from the blood every 24 hours.
Reabsorbed
More than 99% of that filtrate goes straight back into the bloodstream, with pH and electrolytes regulated on the way.
Urine per day
About 1.5 L (1500 mL), from roughly 2.5 L of water taken in over 24 hours.
The three jobs, and the word that comes from failing themThe kidneys remove nitrogenous wastes, regulate water levels, and regulate acid-base balance and electrolytes. Urea and creatinine are the nitrogenous wastes. When they build up in the blood the clinical term is uremia, and that is a sign of renal dysfunction. It is also why kidney function gets checked before iodinated contrast: the ACR Manual asks for a creatinine or eGFR in patients with risk factors such as known kidney disease, dialysis or metformin use.
Skull series
Towne or Caldwell, From the Image Alone
Two axial projections, told apart on sight
Both are axial. Both are centered on the midline. Both angle the tube caudad: 15° for the Caldwell (25° to 30° for its alternative), 30° to the OML for the Towne (37° to the IOML). And they look nothing like each other, once you know what to look at. Find the foramen magnum. Between these two, if you can see it, you are looking at the Towne.
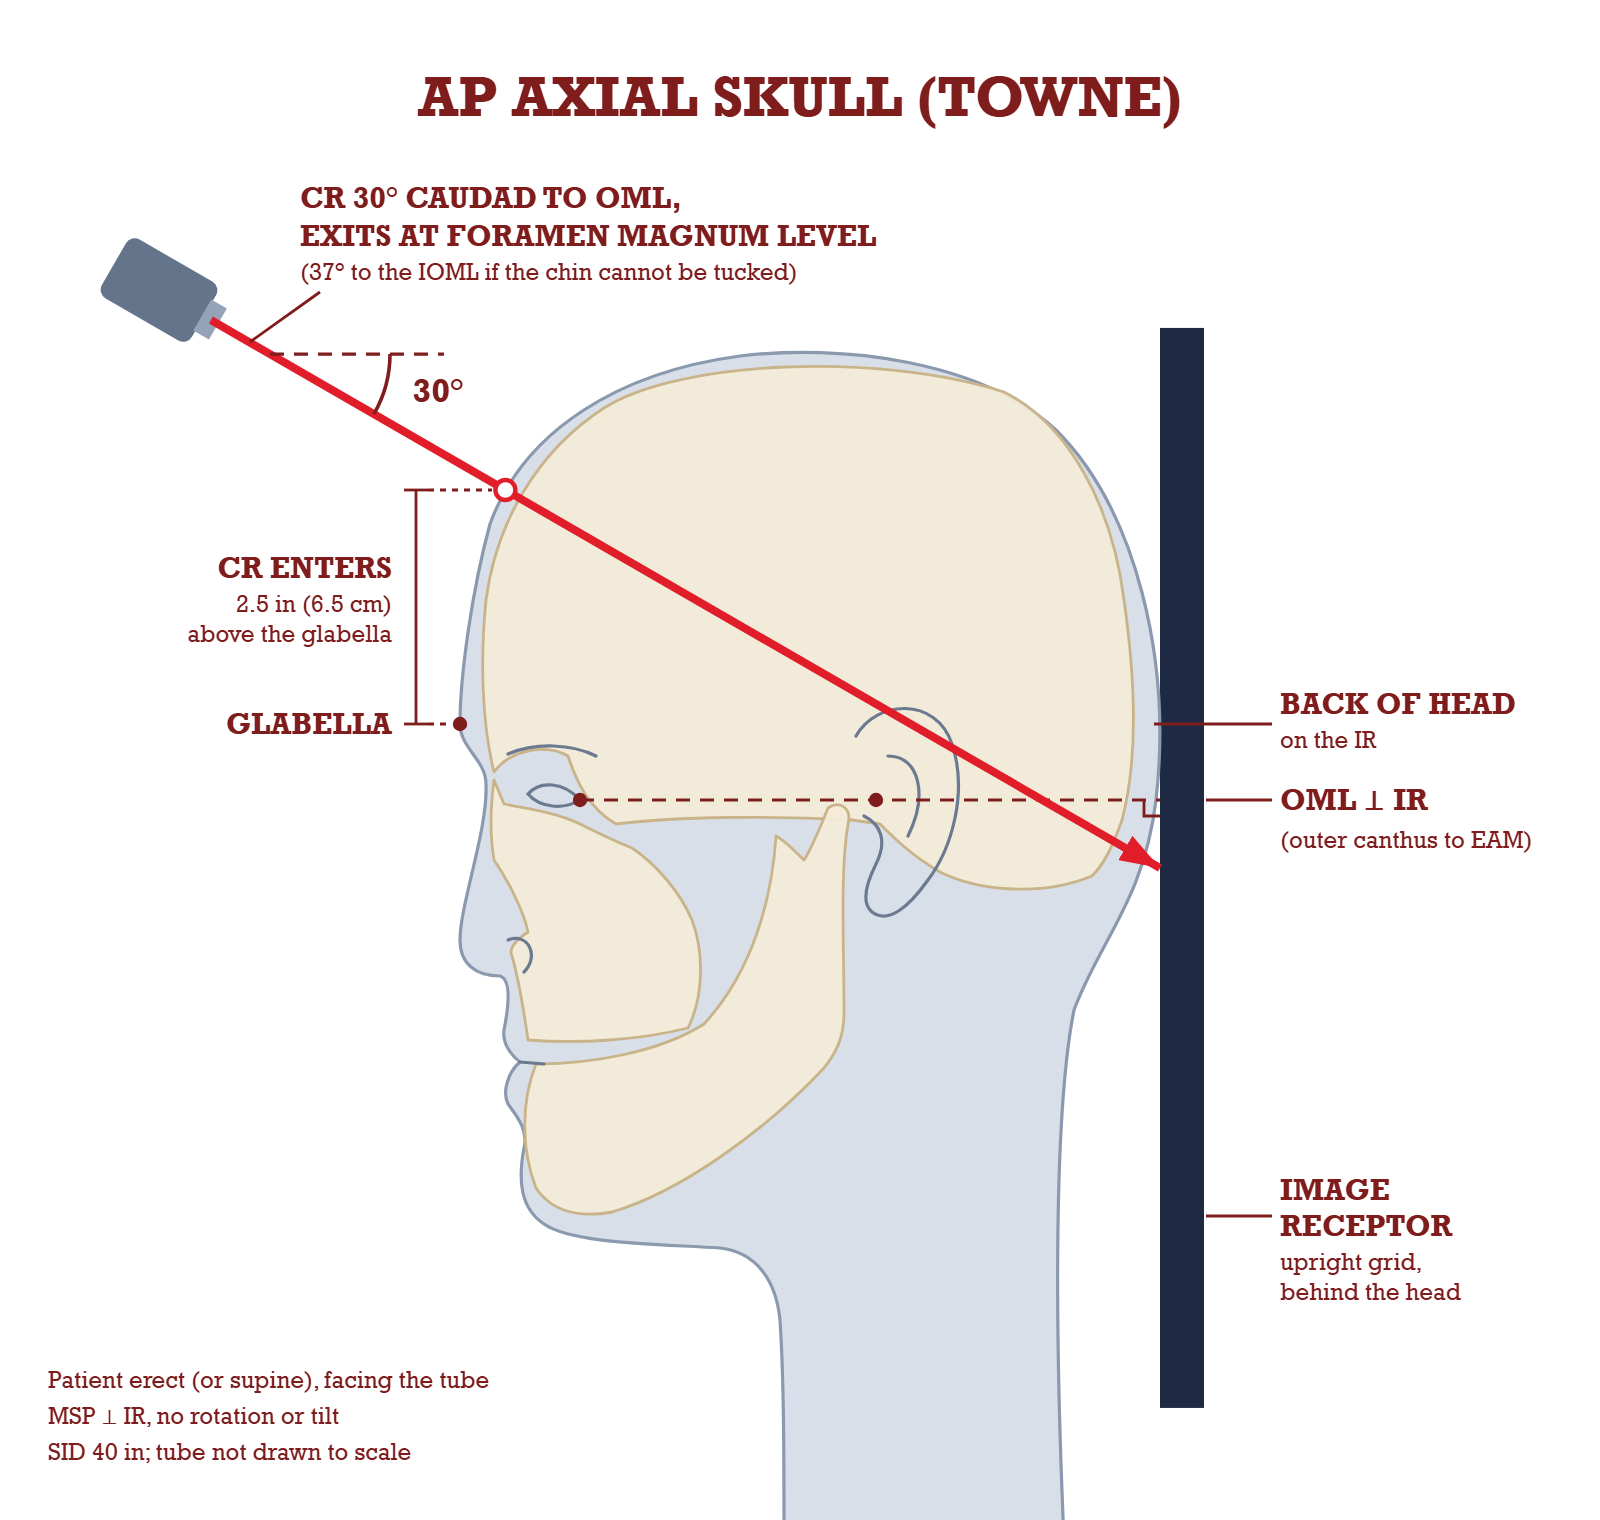
The Towne in setup form: the beam enters the front of the skull, travels down at 30 degrees to the OML, and exits at the level of the foramen magnum into the receptor behind the head. That path is what drops the dorsum sellae into the shadow of the foramen magnum.
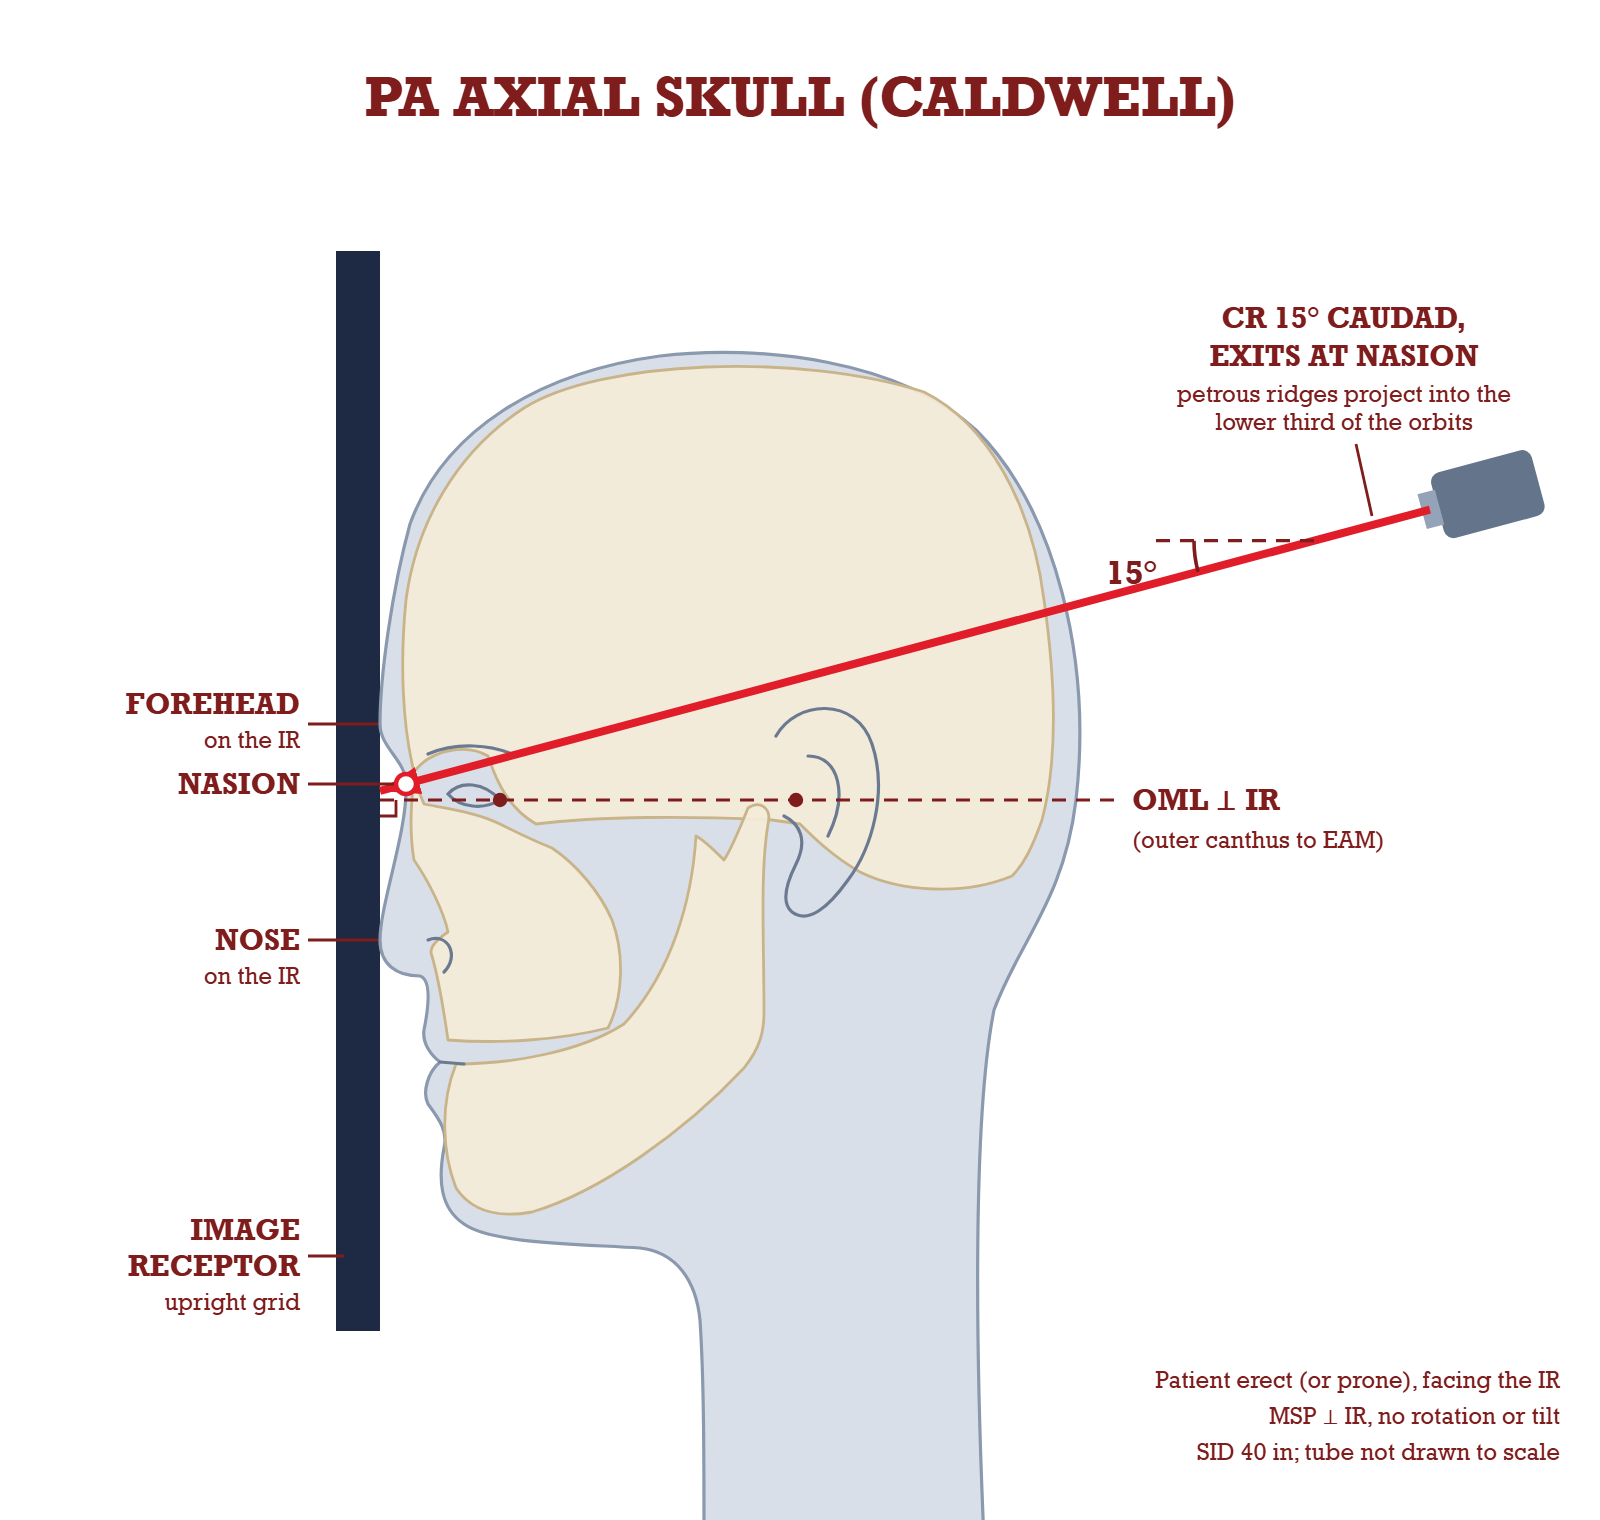
The Caldwell is the mirror case: face against the receptor, OML perpendicular, and only 15 degrees of caudad angle exiting at the nasion. That is why its image is two orbits with ridges in their lower third rather than an occiput with a foramen magnum.
What is on the image
You can see
AP axial (Towne)
PA axial (Caldwell)
Foramen magnum, with the dorsum sellae inside it
yes
no
Occipital bone filling most of the field
yes
no
Petrous pyramids symmetric across the lower field
yes
no
Two orbits with the petrous ridges in the lower third
no
yes
Crista galli in the midline between the orbits
no
yes
Superior orbital fissures inside the orbits
no
yes
Frontal bone and frontal sinuses well seen
no
yes
Both halves of the skull symmetric about the midline
yes
yes
Then the harder question: PA or AP
The standard text asks it, twice
Two critique radiographs in this chapter are captioned with the question Is it a PA or AP axial projection? The answers live in the book's appendix, not on the page.
What actually separates them
Object to receptor distance. On an AP the face is away from the receptor, so the orbits and frontal bone come out larger and less sharp.
The marker
A right or left marker placed on the correct side is the fifth critique category. It labels the side; the book's answer key settles PA or AP by orbit size, not by the marker.
Why it matters clinically
The AP axial is the trauma version, done supine at 15° cephalad (2022 outline only: leaves the exam on 1 March 2027). Knowing which you are holding tells you how the patient arrived.
Do not confuse the Towne with the modified TowneFour projections here carry the Towne name, and no two share a centering point. Skull Towne: 30° to the OML, 2 1/2 inches (6.5 cm) above the glabella. Zygomatic arch modified Towne: also 30° to the OML, but 1 inch (2.5 cm) superior to the nasion. Mandible Towne: 35° to 42° caudad, 1 inch (2.5 cm) superior to the glabella. TMJ modified Towne: 35° from the OML, 3 inches (7.5 cm) superior to the nasion. Same posture every time, four different setups.
Petrous ridges
Where the Petrous Ridges Land
How the frontal head projections are judged
Start from a straight PA with the OML perpendicular and the tube perpendicular. The petrous pyramids project straight into the orbits, ridges sitting at the level of the supraorbital margin, and the facial bones are buried behind them. This projection has limited value for the facial bones.
From there you have two tools, and they do the same job. Angle the tube caudad, or extend the neck. Either one walks the ridges down the image, and the ladder below is what you have to be able to recite.
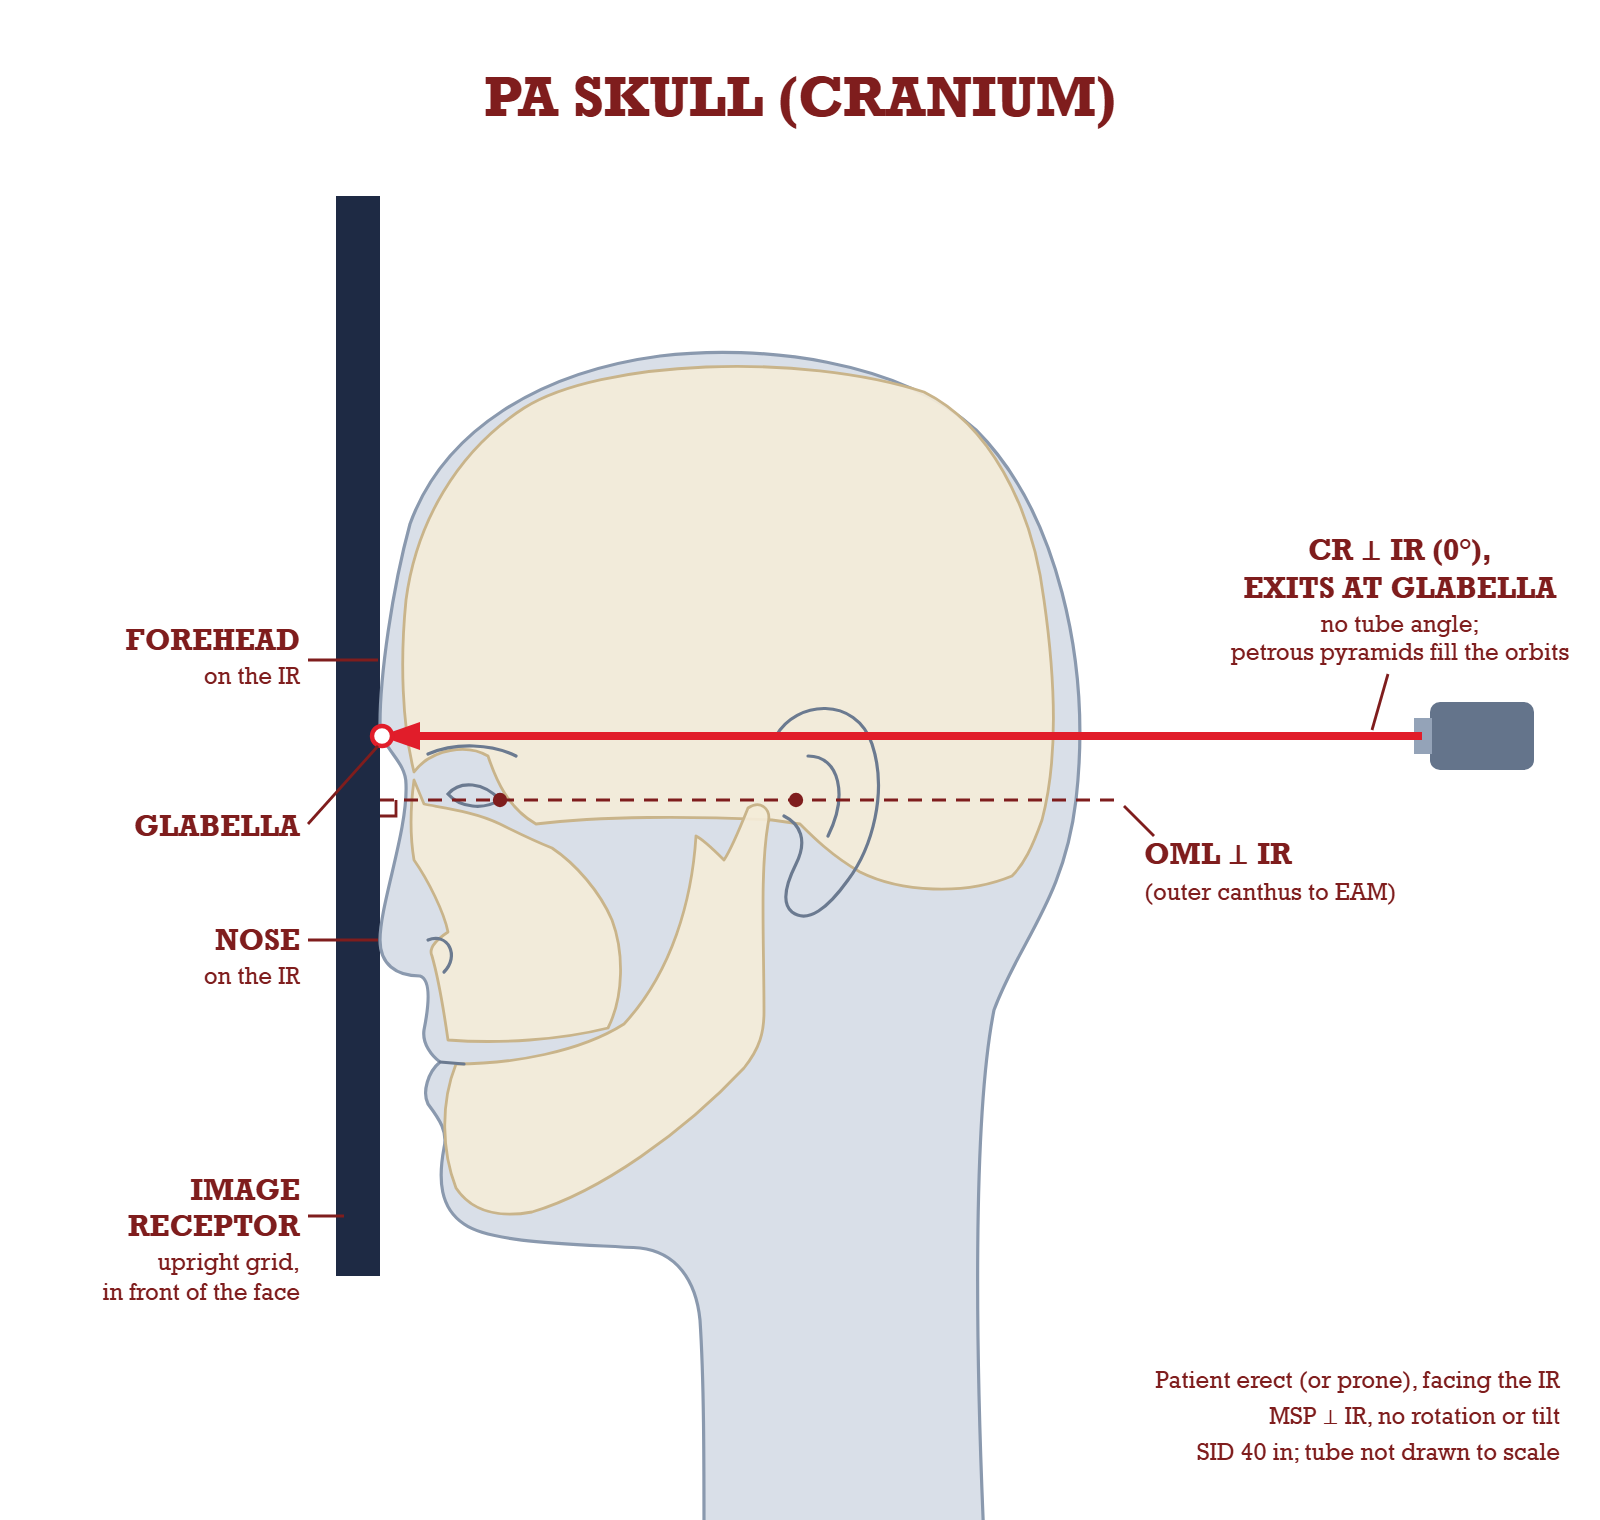
The first rung of the ladder: forehead and nose on the receptor, OML square to it, and a ray with no angle exiting at the glabella. From this setup the petrous pyramids fill the orbits, and every projection that follows exists to move them.
The ladder, top to bottom
PA, CR 0°
OML perpendicular. Petrous portions fill the orbits, ridges at the level of the SOM. Very little facial bone detail.
Modified PA Caldwell, 5° to 10° caudad
Ridges at the midorbital level. A transorbital view used for the internal acoustic meatus.
PA axial Caldwell, 15° caudad
Ridges in the lower one third of the orbits. The supraorbital margins show without superimposition.
PA axial, 25° to 30° caudad
Ridges at or just below the IOM. Opens the whole orbital margin, the superior orbital fissures and the foramen rotundum.
Modified Waters, LML perpendicular
OML at 55°. Ridges in the lower half of the maxillary sinuses, below the IOMs, with the orbital floors perpendicular to the IR.
Waters, MML perpendicular
OML at 37°. Ridges just inferior to the maxillary sinuses. Full extension, full clearance.
Waters against modified Waters, and why the order surprises people
Waters: MML perpendicular, OML 37°
The mentomeatal line anchors at the chin, the lowest point, so making it perpendicular takes the most neck extension. That drops the petrous ridges furthest, clear of the maxillary sinuses entirely. This is the facial bone and maxillary sinus projection.
Modified Waters: LML perpendicular, OML 55°
The lips-meatal line anchors higher than the chin, so it needs less extension. A bigger OML number means less extension, not more. The ridges only reach the lower half of the maxillary sinuses, but the trade buys you orbital floors that are perpendicular to the receptor.
The Towne runs the other wayEverything above is a caudad angle or an extended neck on a PA or a parietoacanthial, with the face toward the receptor. The AP axial Towne is a caudad angle on a supine patient, so the beam travels front to back and downward. It does not tidy the ridges away from the orbits. It projects them symmetrically across the lower field, and drops the dorsum sellae into the shadow of the foramen magnum. Different geometry, different question.
Flashcards
Tap to check.
Real cards from the deck of 1,537. The 786 positioning cards show you the setup.
The ones you miss come back.
Spaced repetition schedules every card, so your time goes where you need it.
3D X-ray Lab
Scroll. You're moving the tube.
A real head CT in a 3D room. As the beam angles, the petrous ridges fall through the orbits on the film beside it. Drag either one to try it yourself.
CAPTURED FROM THE 3D LAB
SIMULATED FROM A REAL CT
0°
PA, 0°Ridges at the level of the SOM.
Modified Caldwell, 5° to 10°Ridges at the midorbital level.
PA axial Caldwell, 15°Ridges in the lower one third of the orbits.
PA axial, 25° to 30°Ridges at or just below the IOM.
Reject Room
Now fix a film that came back.
A rejected Caldwell. Read what's wrong, move the patient, and shoot it again. You get three exposures.
From aboveFrom the side
SIMULATED FROM A REAL CT
Rejected
Positioning
Head to toe, not just the skull.
126 projections, 125 with labelled diagrams, plus central ray and centering. Pick a region.
Formula Toolkit
See the math move.
42 formulas in 4 toolkits, with diagrams and worked practice that checks your answer.
The ARRT's new content specification starts March 1, 2027. Procedures grows from 66 questions to 72, and Safety shrinks from 50 to 46.
Patient Care 33
Safety 50
Image Production 51
Procedures 66
What actually changes on March 1, 2027
Procedures, 66 to 72
Adds lumbar puncture, epidural and joint injections, and nasogastric or enteric tube placement. Intravenous urography comes out.
Image Production, stays 51
The biggest content shift. Named computed radiography topics are removed, virtual grids come in and compensating filters go.
Safety, 50 to 46
Body habitus replaces morbid obesity. Digital detectors (DQE, exposure latitude) replace image receptors. Pregnancy, Image Wisely and Image Gently are added to minimizing exposure and repeats.
Patient Care, 33 to 31
Patient scheduling is added to communication. IV supplies are added to contaminated disposal.
2,584 questions with rationales. Full mocks run 200 questions on a 3:50:00 clock.
Spot the trap
Start free. Everything carries over.
One plan to look at first. The other two are a line each if your date needs them.
Best deal if your exam is 6+ months out or not booked
Annual Opens soon
$16.58 a month
$199 a year, renews until you cancel. Save 57% vs monthly.
Start free
Free today, no card. Upgrade when you're ready and everything carries over.
Everything is included: 28 chapters, 2,584 questions, unlimited mock exams, 1,537 flashcards, the Formula Toolkit, the 3D X-ray lab and Reject Room.
30-day refund on your first Monthly or Annual purchase
Didn't pass? On a paid plan for 30+ days with one full mock done, we extend your access free, 90 days at a time. Access, not cash. See conditions
Exam in the next 90 days? 90-Day Pass, $99 once, never renews. Buying within 30 days of your exam? The pass guarantee won't apply. Opens soonGet the 90-Day Pass, $99
Rather go month to month? Monthly, $39, renews monthly, cancel anytime. Opens soonGet Monthly, $39
FreeAvailable now
3 chapters, 50 questions, 1 full timed mock
$0No card
MonthlyOpens soon
90-Day PassOpens soon
$99Once, no auto-renew
Best deal
AnnualOpens soon
$199About $16.58 a month. Save 57% vs monthly.
New exam spec
Everything carries over. Every paid plan has all 28 chapters, 2,584 questions, unlimited mock exams, all 1,537 flashcards, the Formula Toolkit, the 3D X-ray lab and Reject Room.
It's simulated from a real head CT: the public-domain Visible Human dataset from the U.S. National Library of Medicine. It's a study tool built from one scan, not a clinical image.
Is this aligned to the current ARRT exam?
Yes. Through February 28, 2027 the ARRT split is Patient Care 33, Safety 50, Image Production 51, Procedures 66. From March 1, 2027 it is 31, 46, 51 and 72. Mock exams follow the specification in effect.
Do I need to install an app?
No. It runs in the browser on iPhone, iPad and desktop.